SAL User Guide
Introduction
This document briefly describes how to use the SAL SDK to generate application level code to utilize the supported services (Commanding, Telemetry and Events).
The SAL SDK should be installed on a modern (x86_64) Linux computer. The current baseline recommend configuration is 64-bit AlmaLinux 9.x.
The following packages should also be installed prior to working with the SDK (use either the rpm or yum package managers for AlmaLinux, and apt-get, dpkg, or synaptic for Debian based systems. Installation of system packages must be done using sudo (eg sudo yum install, or sudo apt-get install).
gcc-c++
make
ncurses-libs or ncurses-dev
xterm
xorg-x11-fonts-misc
java-17-zulu-openjdk-jdk
maven
git
tk-devel
avro-tools
The distribution includes dedicated versions of the following packages
Kafka-client and dependencies
All the services are built upon a framework of Apache Kafka Code may be autogenerated for a variety of compiled and scripting languages, as well as template documentation, and components appropriate for ingest by other software engineering tools.
A comprehensive description of the SAL can be found in LSE-74, navigate to the directory with a web browser to view the hyper-linked documentation.
Installation
Overview
A minimum of 800Mb of disk space is required, and at least 1Gb is recommended to leave some space for building the test programs.
Installation from Git repositories
Use a git client of your preference to check out the required branch of the following repositories
and then install the XML topic definitions
cd ts_xml
pip install .
Install location customization
If you chose to install the SDK in a location other than /opt, then you will need to edit the first line of the setup.env script to reflect the actual location. e.g.
LSST_SDK_INSTALL=/home/saltester
Another important environment variable is SAL_WORK_DIR. This is the directory in which you will run the SAL tools, and in which all the output files and libraries will be generated. By default this will be the “test” subdirectory in LSST_SDK_INSTALL, but you can change SAL_WORK_DIR to redefine it if required.
ALL THE salgenerator STEPS MUST BE RUN FROM THE SAL_WORK_DIR DIRECTORY
If you will be running SAL applications in parallel with other users on your subnet , it is advisable to run your own Kafka broker locally.
AAdd the invocation of setup.env to your bash login profile
source /sal-install-directory/setupKafka.env
The most common SDK usage consists of simple steps :
Define Telemetry, Command or Log activity in ts_xml
Generate the interface code using
salgeneratorModify the autogenerated sample code to fit the application required.
Build if necessary, and test the sample programs
Example makefiles are provided for all the test programs. The list of libraries required to link with the middleware can be found in section 8.0
Installation in a virtual machine
The SDK has been tested in a Virtual Machine environment (VirtualBox). To set up a VM appropriately for this usage :
In VM configuration, choose Bridged Adaptor for the network
Add a sal user account during OS installation, the user should be an administrator
Choose Gnome Desktop + Development tools during OS installation
From VM menu, install Guest Additions
Once the OS has booted, enable the network
Verify the network is ok.
sudo yum install xterm xorg-x11-fonts-misc java-17-zulu-openjdk-jdk maven tk-devel
Standard usage
Normal usage of the SDK comprise of four main steps
Define Telemetry, Command, and Event datatypes (either using the SAL VM website interface, or an asci or XML editor). In some cases the XML from another subsystem might provide a useful bootstrap. See the ts_xml repository.
Generate the interface code using the
salgeneratorModify the autogenerated sample code to fit the application required
Build and test the sample programs
Example makefiles are provided for all the test programs. The list of libraries required to link an application with the middleware can be found in section 8.0
Data Definition
In all XML data definition files the IDL_Type keyword is used to specify the datatype of each field. The following datatypes are supported:
short
long (this is 4 byte integer, and is represented as int on Linux 64-bit)
long long (8 byte integer)
unsigned short
unsigned long (this is a 4 byte integer, and is represented as int on Linux 64-bit)
unsigned long long (8 byte integer)
float
double
char, specify length using the Count tag
boolean
octet (sequence of unsigned bytes)
string, specify length using the Count tag
numeric arrays, use the Count tag with any numeric type
If there is a time-of-data associated with an item, then it should be named “timestamp”, and be of type double. The time should be TAI time as returned by the getCurrentTime method. If more than one timestamp is needed in a topic, then they should be named “timestamp-name1, timestamp-name2 etc”. If an array of times is required, then the type should be “double timestamp[size]”.
Telemetry Definition
A very simple XML schema is used to define a telemetry topic. The topic is the smallest unit of information which can be exchanged using the SAL mechanisms.
The following Reserved words may NOT be used names and will flag an error at the validation phase (once the SAL System Dictionary is finalized, the item names will also be validated for compliance with the dictionary).
Reserved words : https://openapi-generator.tech/docs/generators/avro-schema/#reserved-words
e.g.
<SALTelemetry>
<Subsystem>hexapod</Subsystem>
<Version>2.5</Version>
<Author>A Developer</Author>
<EFDB_Topic>hexapod_LimitSensors</EFDB_Topic>
  <item>
    <EFDB_Name>liftoff</EFDB_Name>
    <Description></Description>
    <Frequency>0.054</Frequency>
    <IDL_Type>short</IDL_Type>
    <Units></Units>
    <Conversion></Conversion>
    <Count>18</Count>
  </item>
  <item>
    <EFDB_Name>limit</EFDB_Name>
    <Description></Description>
    <Frequency>0.054</Frequency>
    <IDL_Type>short</IDL_Type>
    <Units></Units>
    <Count>18</Count>
  </item>
</SALTelemetry>
Command Definition
The process of defining supported commands is similar to Telemetry using XML. The command aliases correspond to the ones listed in the relevant subsystem ICD. e.g.
<SALCommand>
<Subsystem>hexapod</Subsystem>
<Version>2.5</Version>
<Author>salgenerator</Author>
<EFDB_Topic>hexapod_command_configureAcceleration</EFDB_Topic>
<Alias>configureAcceleration</Alias>
<Device>drive</Device>
<Property>Acceleration</Property>
<Action></Action>
<Value></Value>
<Explanation>http://sal.lsst.org/SAL/Commands/hexapod_command_configureAcceleration.html</Explanation>
  <item>
    <EFDB_Name>xmin<EFDB_Name>
    <Description> </Description>
    <IDL_Type>double</IDL_Type>
    <Units> </Units>
    <Count>1</Count>
  </item>
  <item>
    <EFDB_Name>xmax</EFDB_Name>
    <Description> </Description>
    <IDL_Type>double</IDL_Type>
    <Units> <Units>
    <Count>1<Count>
  </item>
</SALCommand>
Note
The generic lifecycle commands should NOT be included, they are automatically generated during the salgenerator validation and/or UML to XML processing. The current generic command set is {start, stop, enable,disable,abort,enterControl,exitControl,standby,SetValue}
Log Event Definition
Events are defined in a similar fashion to commands. e.g. The Log Event aliases are as defined in the relevant ICD. e.g.
<SALEvent>
  <Subsystem>hexapod</Subsystem>
  <Version>2.4</Version>
  <Author>salgenerator</Author>
  <EFDB_Topic>hexapod_logevent_limit</EFDB_Topic>
  <Alias>limit<Alias>
  <Explanation>http://sal.lsst.org/SAL/Events/hexapod_logevent_limit.html</Explanation>
    <item>
      <EFDB_Name>priority</EFDB_Name>
      <Description>Severity of the event</Description>
      <IDL_Type>long</IDL_Type>
      <Units>NA</Units>
      <Count>1</Count>
    </item>
    <item>
      <EFDB_Name>axis</EFDB_Name>
      <Description> </Description>
      <IDL_Type>string</IDL_Type>
      <Units> </Units>
      <Count>1</Count>
    </item>
    <item>
      <EFDB_Name>limit</EFDB_Name>
      <Description> </Description>
      <IDL_Type>string</IDL_Type>
      <Units> </Units>
      <Count>1</Count>
    </item>
    <item>
      <EFDB_Name>type</EFDB_Name>
      <Description> </Description>
      <IDL_Type>string</IDL_Type>
      <Units></Units>
      <Count>1</Count>
    </item>
</SALEvent>
Note
The generic lifecycle events should NOT be included, they are automatically generated during the salgenerator validation and/or UML to XML processing. The current generic event set is SettingVersions, SummaryState, DetailedState, ErrorCode, AppliedSettingsMatchStart.
Updating the XML definitions
The XML definitions of the SAL objects for each subsystem are maintained in a github repository (https://github.com/lsst-ts/ts_xml). When subsystem developers update the XML definitions for their interfaces, they should create a new feature branch in the github repository and put the modified version into it. Once the feature(s) have been fully tested, the corresponding changes are made made to the appropriate ICD. Once the ICD has been approved by the Change Control Board, the modified XML will merged into the master branch and assigned an official release number. The master (release) branch is used to generate the SAL runtime libraries which can be used by other subsystems for integration testing. The master branch is also used by the Continuous Integration Unit Testing framework.
The XML definition files for the subsystem you are developing should be checked out of the github repository to ensure you are working with the latest version.
The SAL tools must be run from the SAL_WORK_DIR directory.
Using the SDK
Before using the SDK, make sure that all the directories in the SAL_WORK_DIR and The SAL installation directory are owned by you e.g. .. prompt:: bash
cd $SAL_WORK_DIR chown -R <username>:<username> *
Once Telemetry/Command/Events have been defined,
e.g. for skycam, interface code and usage samples can be generated using the salgenerator tool. e.g.
**salgenerator skycam validate**
**salgenerator skycam sal cpp**
would generate the c++ communications libraries to be linked with any user code which needs to interface with the skycam subsystem.
The “sal” keyword indicates SAL code generation is the required operation, the selected wrapper is cpp (GNU G++ compatible code is generated, other options are java, cpp).
C++ code generation produces a shared library for type support and another for the SAL API. It also produces test executables to publish and subscribe to all defined Telemetry streams, and to send all defined Commands and log Events.
Java code generation produces a .jar class library for type support and another for the SAL API. It also produces .jar libraries to test publishing and subscribing to all defined Telemetry streams, and to send all defined Commands and log Events.
Simple example scripts to perform the major functions can be found later in this document.
The “maven” keyword indicates that a Maven project should be built for the subsystem. This will be placed in $SAL_WORK_DIR/maven/[subsystem]_[version], The “sal java” step must previously have been run).
Recommend sequence of operations
Create the XML Telemetry, Command, and Event definitions
Use the salgenerator validate operation
Use the salgenerator html operation
Use the salgenerator sal operation
Verify test programs run correctly
Build the SAL shared library / JAR for the subsystem
Begin simulation/implementation and testing
Step 1 - Definition
Use an XML editor to create/modify the set of subsystem xml files. Each file should be appropriately named and consists of a either Telemetry, Command, or Event definitions. The current prototypes for each subsystem can be found at https://github.com/lsst-ts/ts_xml.
Step 2 - Validation
Run the salgenerator tool validate option for the appropriate subsystem.
salgenerator MTMount validate
The successful completion of the validation phase results in the creation of the following files and directories
avro-templates–Corresponding kafka Topic avro schema sql–database table definitions for telemetry
Step 3-Code Generation
Run the salgenerator tool using the sal option for the appropriate subsystem. The sal option requires at least one target language to also be specified. The current target language are cpp, java.
Depending upon the target language, successful completion of the code generation results in the following output directories (e.g. for mount) .. code:
e.g. salgenerator MTMount sal cpp

c++ -
    MTMount: - *common mount support files*

        cpp
        java

    MTMount/cpp:
        sal_MTMount.cpp - item access support
        sal_MTMount.h - type support class
        src

    MTMount/cpp/src:
        Makefile.sacpp_MTMount_cmd - command support makefile
        Makefile.sacpp_MTMount_event - event support makefile
        sacpp_MTMount_cmd - *test program*
        sacpp_MTMount_ctl - *test program*
        sacpp_MTMount_event - *test program*
        sacpp_MTMount_eventlog - *test program*
        sal_MTMount.h - SAL class headers
        sal_MTMountC.h - SAL C support
        sal_MTMount.cpp - SAL class
Once the java has been generated it is also possible to create a Maven project for ease of distribution. Use the command e.g.
salgenerator MTMount maven
will create and build a maven project and it in
$SAL_WORK_DIR/maven/MTMount_[sal-version-number]
salgenerator Options
The salgenerator executes a variety of processes, depending upon the options selected.
validate - check the XML files, generate validated IDL
sal [lang] - generate SAL C++, Java or wrappers
lib - generate the SAL shared library for a subsystem
maven - generate a maven project (per subsystem)
verbose - be more verbose ;-)
SAL API examples
The SAL code generation processes also generates a comprehensive set of test programs so that correct operation of the interfaces can be verified.
Sample code is generated for the C++, Java target languages currently.
The sample code provides a simple command line test for
publishing and subscription for each defined Telemetry type
issuing and receiving each defined Command type
generating and logging for each defined Event type
Testing
Environment
To check that the SAL environment has been correctly initialized; in a terminal type
salgenerator
shoud produce
SAL generator tool - Usage:
    salgenerator subsystem flag(s)
    where flag(s) may be
        validate - check the XML Telemetry/Command/LogEvent definitions
        sal - generate SAL wrappers for cpp, java
        lib - generate shared library
        maven - generate a maven repository
        verbose - be more verbose ;-;
Verify tha the network interface is configured and operating correctly.
Telemetry
Once the salgenerator has been used to validate the definition files and generate the support libraries, there will be automatically built test programs available.
The following locations assume code has been built for the skycam subsystemsupport, there will be separate subdirectories for each Telemetry stream type.
For C++
    skycam_<telemetryType>/cpp/standalone/sacpp_skycam_pub - publisher
    skycam_<telemetryType>/cpp/standalone/sacpp_skycam_sub - subscriber
start the subscriber first, then the publisher.
Commands
The following locations assume code has been built for mount subsystemsupport
For C++
    mount/cpp/src/sacpp_MTMount_[command]_commander - to send commands
    mount/cpp/src/sacpp_MTMount_[command]_controller - to process commands
    start the controller first, wait for it to print Ready, then run the commander
Events
The following locations assume code has been built for mount subsystem support
For C++
    mount/cpp/src/sacpp_MTMount_[event]_send - to generate events
    mount/cpp/src/sacpp_MTMount_[event]_log - to log the events
    start the event logger first and then the send
Application programming Interfaces
C++
Includes:
    #include <string>
    #include <sstream>
    #include <iostream>
    #include "SAL_[subsystem].h"
    using namespace <subsystem>; // substitute the actual subsystem name here

Public:
    int putSample(<subsystem::telemetryType> data); - publish telemetry sample
    int getSample(<subsystem::telemetryTypeSeq> data); - read next telemetry sample
    int putSample_<telemetryType>(<subsystem::telemetryTypeC>*data); - publish telemetry sample (C)
    int getSample_<telemetryType>(<subsystem::telemetryTypeC>*data); - read next telemetry sample (C)
    void salTypeSupport(char*topicName); - initialize type support
    void salTelemetryPub(char *topicName); - create telemetry publisher object
    void salTelemetrySub(char *topicName); - create telemetry subscriber object
    void salEvent(char *topicName); - create event object
    int getResponse(<subsystem>::ackcmdSeq data); - read command ack
    int getEvent(<subsystem>::logeventSeq data); - read event data
    void salShutdown(); - tidyup
    void salCommand(); - create command object
    void salProcessor(); - create command processor object
    int issueCommand(<subsystem>::command data); - send a command
    int issueCommandC(<subsystem_commandC *data>; - send a command (C)
    int ackCommand(int cmdSeqNum, long ack, long error, char *result); - acknowledge a command
    int acceptCommand(<subsystem>::commandSeq data); - read next command
    int acceptCommandC(<subsystem>::commandC *data); - read next command (C)
    int checkCommand(int cmdSeqNum); - check command status
    int cancelCommand(int cmdSeqNum); - abort all commands
    int waitForCompletion(int cmdSeqNum, unsigned int timeout); - wait for command to complete
    int setDebugLevel(int level); - change debug info level
    int getDebugLevel(int level) - get cureent debug info level
    int getOrigin(); - get origin descriptor
    int getProperty(stringproperty, stringvalue); - get configuration item
    int setProperty(stringproperty, stringvalue); - set configuration item
    int getPolicy(stringpolicy, stringvalue); - get middleware policy item
    int setPolicy(stringpolicy, stringvalue); - set middleware policy item
    void logError(int status); - log middleware error
    salTIME currentTime(); - get current timestamp
    int logEvent(char *message, int priority); - generate a log event
SAL XML Schema
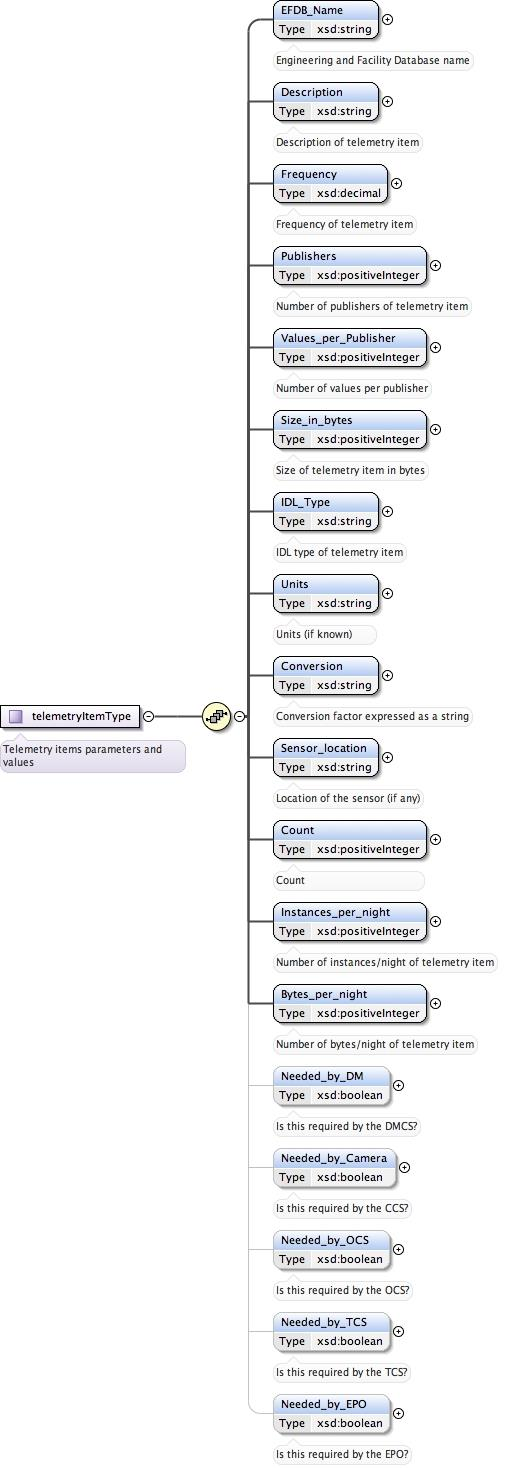
Telemetry
telemetrySetType

telemetryType
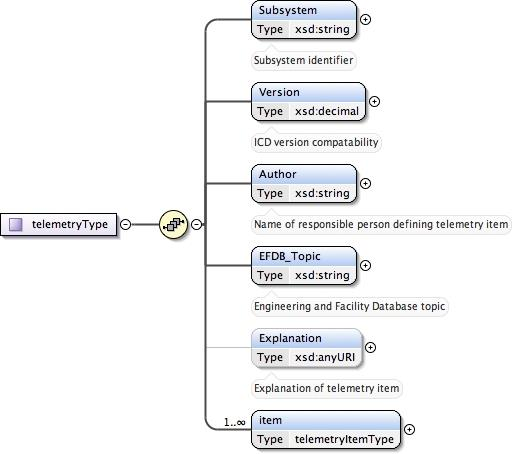
telemetryItemType
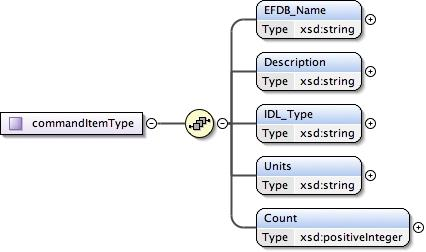
Commands
commandSetType

commandType
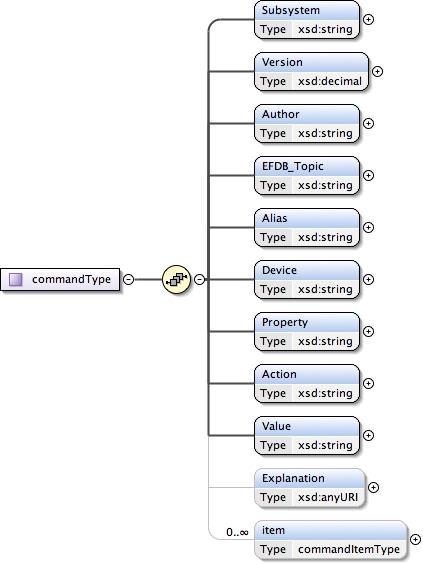
commandItemType
Events
eventSetType

eventType
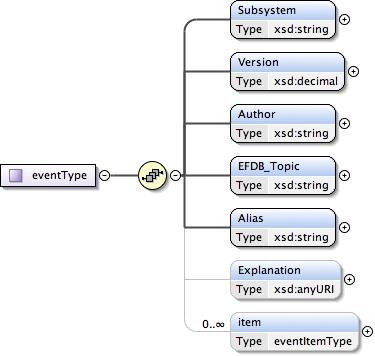
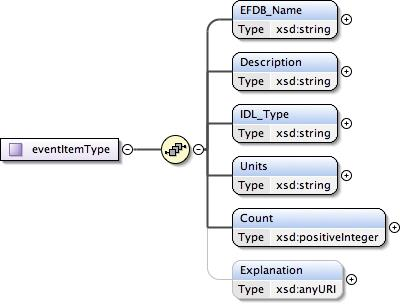
eventItemType
Compiler Options and Link Libraries
The following compiler options are required when compiling application code. For subsequent linking with the SAL and Kafka middleware.
CFLAGS/CXXFLAGS : -m64 -D_REENTRANT -fPIC -Wno-write-strings
Subsystems with duplicate instantiations (e.g. Hexapods) also require
-DSAL_SUBSYSTEM_IS_KEYED
and the following include paths will be required .. code:
-I$(LSST_SAL_PREFIX)/include
-I$(LSST_SAL_PREFIX)/include/avro
-I$(SAL_HOME)/include
-I$(SAL_WORK_DIR)/include
-I../../-subsys-/cpp/src

where -subsys- is the subsystem name e.g. hexapod
The following libraries are required when linking an application to use the SAL and Kafka middleware. For an application that communicates with multiple subsystems, the SAL libraries for each must be included.
SAL : libSAL_[subsystem-name].so
KAFKA : -L/usr/lib64/boost1.78 -lboost_filesystem -lboost_iostreams -lboost_program_options -lboost_system /opt/lsst/ts_sal/lib/libserdes++.a /opt/lsst/ts_sal/lib/libserdes.a -L/opt/lsst/ts_sal/lib -lcurl -ljansson -lrdkafka++ -lrdkafka -lavrocpp -lavro -lsasl2
Other: -ldl -lrt -lpthread
Appropriate linker path directives are
-L$(LSST_SAL_PREFIX)/lib -L$(SAL_HOME)/lib